Bitbucket Pipelines Integration with QA Sphere
Automatically upload test results from your Bitbucket Pipelines to QA Sphere using the QAS CLI tool. This integration eliminates manual result entry and provides instant visibility into your automated test results.
What You'll Achieve
With this integration, every time your Bitbucket Pipeline runs:
- Test results automatically upload to QA Sphere
- New test runs are created with pipeline information
- Tests are matched to existing QA Sphere test cases
- Pass/fail status, execution time, and screenshots are recorded
- Test history and trends are tracked over time
Prerequisites
Before starting, ensure you have:
- A Bitbucket repository with automated tests (Playwright, Cypress, Jest, etc.)
- Tests configured to generate JUnit XML format results
- A QA Sphere account with Test Runner role or higher
- Test cases in QA Sphere with markers (e.g.,
BD-001,PRJ-123)
How It Works
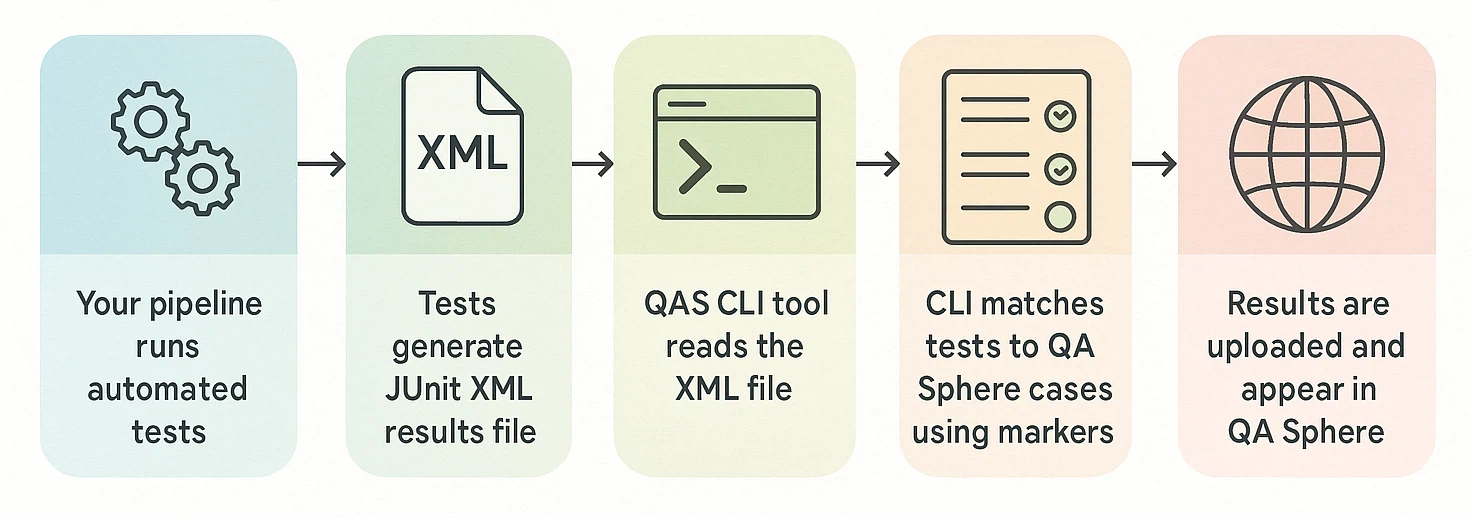
- Your pipeline runs automated tests
- Tests generate JUnit XML results file
- QAS CLI tool reads the XML file
- CLI matches tests to QA Sphere cases using markers
- Results are uploaded and appear in QA Sphere
Setup Steps
Step 1: Create QA Sphere API Key
- Log into your QA Sphere account
- Click the gear icon ⚙️ in the top right → Settings
- Navigate to API Keys
- Click Create API Key
- Copy and save the key - you won't see it again!
Your API key format: t123.ak456.abc789xyz
Step 2: Configure Bitbucket Variables
Add these secrets to your Bitbucket repository:
- Go to your Bitbucket repository
- Navigate to Repository settings → Repository variables
- Click Add variable and create:
| Name | Value | Secured |
|---|---|---|
QAS_TOKEN | Your API key (e.g., t123.ak456.abc789xyz) | ✓ Checked |
QAS_URL | Your QA Sphere URL (e.g., https://company.eu1.qasphere.com) | ☐ Unchecked |
- Click Add to save each variable
Never commit API keys to your repository. Always use Bitbucket Repository variables with the "Secured" option enabled.
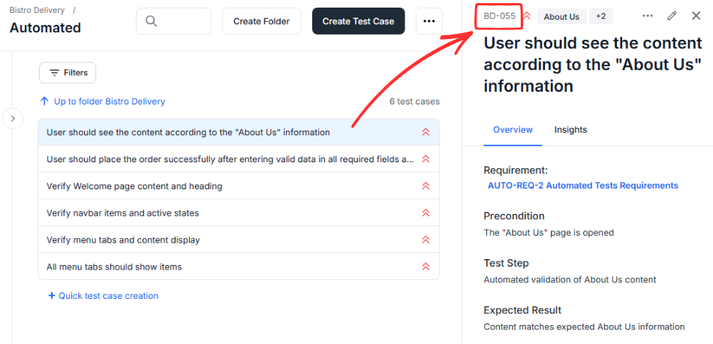
Step 3: Add Test Case Markers
Ensure your test names include QA Sphere markers in the format PROJECT-SEQUENCE:
These markers can be found in QA Sphere interface for each test case separately.
Playwright Example:
test('BD-001: User can login with valid credentials', async ({ page }) => {
  await page.goto('https://example.com/login');
  await page.fill('#username', 'user@example.com');
  await page.fill('#password', 'password123');
  await page.click('#login-button');
  await expect(page).toHaveURL('/dashboard');
});

test('BD-002: User sees error with invalid credentials', async ({ page }) => {
  // test implementation
});
Cypress Example:
describe('Login Flow', () => {
  it('BD-001: should login successfully with valid credentials', () => {
    cy.visit('/login');
    cy.get('#username').type('user@example.com');
    cy.get('#password').type('password123');
    cy.get('#login-button').click();
    cy.url().should('include', '/dashboard');
  });
});
Jest Example:
describe('API Tests', () => {
  test('BD-015: GET /users returns user list', async () => {
    const response = await fetch('/api/users');
    expect(response.status).toBe(200);
    const data = await response.json();
    expect(data).toHaveLength(5);
  });
});
Step 4: Configure Test Framework
Configure your test framework to generate JUnit XML output:
Playwright Configuration
// playwright.config.js
const { defineConfig } = require('@playwright/test');

module.exports = defineConfig({
  testDir: './tests',
  timeout: 30000,

  // JUnit reporter for CI/CD
  reporter: [
    ['list'],  // Console output
    ['junit', { outputFile: 'junit-results/results.xml' }]  // For QA Sphere
  ],

  use: {
    headless: true,
    screenshot: 'only-on-failure',
    video: 'retain-on-failure',
  },

  projects: [
    { name: 'chromium', use: { browserName: 'chromium' } },
    { name: 'firefox', use: { browserName: 'firefox' } },
    { name: 'webkit', use: { browserName: 'webkit' } },
  ],
});
Cypress Configuration
// cypress.config.js
const { defineConfig } = require('cypress');

module.exports = defineConfig({
  e2e: {
    reporter: 'cypress-multi-reporters',
    reporterOptions: {
      configFile: 'reporter-config.json'
    }
  }
});
// reporter-config.json
{
  "reporterEnabled": "spec, mocha-junit-reporter",
  "mochaJunitReporterReporterOptions": {
    "mochaFile": "junit-results/results.xml"
  }
}
Jest Configuration
// jest.config.js
module.exports = {
  reporters: [
    'default',
    ['jest-junit', {
      outputDirectory: './junit-results',
      outputName: 'results.xml',
      classNameTemplate: '{classname}',
      titleTemplate: '{title}'
    }]
  ]
};
Step 5: Create Bitbucket Pipeline
Create a bitbucket-pipelines.yml file in your repository root:
For Playwright Projects
image: node:18

definitions:
  steps:
    - step: &test-and-upload-step
        name: Run Playwright Tests and Upload to QA Sphere
        # IMPORTANT: Use Playwright Docker image matching your @playwright/test version
        image: mcr.microsoft.com/playwright:v1.51.1-jammy
        caches:
          - node
        script:
          - npm ci
          - npx playwright test || true
          - npm install -g qas-cli
          - qasphere junit-upload --run-name "bitbucket-pipeline_{YYYY}-{MM}-{DD}" ./junit-results/results.xml
          - echo "✅ Test results uploaded to QA Sphere"
        artifacts:
          - junit-results/**
          - test-results/**
          - playwright-report/**

pipelines:
  default:
    - step: *test-and-upload-step

  branches:
    main:
      - step: *test-and-upload-step

    develop:
      - step: *test-and-upload-step

  pull-requests:
    '**':
      - step: *test-and-upload-step
For Cypress Projects
image: node:18

definitions:
  steps:
    - step: &test-step
        name: Run Cypress Tests
        image: cypress/browsers:node18.12.0-chrome107
        caches:
          - node
        script:
          - npm ci
          - npx cypress run
        artifacts:
          - junit-results/**
          - cypress/videos/**
          - cypress/screenshots/**

    - step: &upload-step
        name: Upload Results to QA Sphere
        image: node:18
        script:
          - npm install -g qas-cli
          - qasphere junit-upload --attachments ./junit-results/results.xml
          - echo "✅ Results uploaded to QA Sphere"

pipelines:
  default:
    - step: *test-step
    - step: *upload-step

  branches:
    main:
      - step: *test-step
      - step: *upload-step

    develop:
      - step: *test-step
      - step: *upload-step

  pull-requests:
    '**':
      - step: *test-step
      - step: *upload-step
For Jest Projects
image: node:18

definitions:
  caches:
    node: node_modules

  steps:
    - step: &test-step
        name: Run Jest Tests
        caches:
          - node
        script:
          - npm ci
          - npm test
        artifacts:
          - junit-results/**
          - coverage/**

    - step: &upload-step
        name: Upload Results to QA Sphere
        script:
          - npm install -g qas-cli
          - qasphere junit-upload ./junit-results/results.xml
          - echo "✅ Results uploaded to QA Sphere"

pipelines:
  default:
    - step: *test-step
    - step: *upload-step

  branches:
    main:
      - step: *test-step
      - step: *upload-step

    develop:
      - step: *test-step
      - step: *upload-step

  pull-requests:
    '**':
      - step: *test-step
      - step: *upload-step
Step 6: Push and Verify
- Commit your changes:
git add bitbucket-pipelines.yml playwright.config.js  # or your config files
git commit -m "Add Bitbucket Pipelines with QA Sphere integration"
git push origin main
- Monitor the pipeline:
- Go to Bitbucket → Pipelines
- Watch your pipeline execute
- Check both
Run Playwright TestsandUpload Results to QA Spheresteps

- Verify in QA Sphere:
- Log into QA Sphere
- Navigate to your project → Test Runs
- See the new run with your test results
Viewing Your Automated Test Run in QA Sphere
After your pipeline uploads results, you can view and analyze the test run in QA Sphere.
Navigating to Test Runs
- Log into QA Sphere and select your project
- Click Test Runs in the left sidebar
- Find your automated run - it will be named based on your
--run-nametemplate or the default format:- Default:
Automated test run - Jan 15, 2025, 02:30:45 PM - Custom:
Build #12345 - main(if you configured a custom template)
- Default:

Click on any test case to see:
- Execution History - How this test performed over time
- Error Messages - Full stack traces for failed tests
- Attachments - Screenshots captured on failure
- Linked Test Case - Jump to the original test case definition
Advanced Usage
Available CLI Options
The QAS CLI junit-upload command creates a new test run within a QA Sphere project from your JUnit XML files or uploads results to an existing run.
qasphere junit-upload [options] <path-to-junit-xml>
Options:
-r, --run-url <url>- Upload to an existing test run (otherwise creates a new run)--run-name <template>- Name template for creating new test runs (only used when--run-urlis not specified)--attachments- Detect and upload attachments (screenshots, videos, logs)--force- Ignore API request errors, invalid test cases, or attachment issues-h, --help- Show command help
Run Name Template Placeholders
The --run-name option supports the following placeholders:
Environment Variables:
{env:VARIABLE_NAME}- Any environment variable (e.g.,{env:BITBUCKET_BUILD_NUMBER},{env:BITBUCKET_COMMIT})
Date Placeholders:
{YYYY}- 4-digit year (e.g., 2025){YY}- 2-digit year (e.g., 25){MMM}- 3-letter month (e.g., Jan, Feb, Mar){MM}- 2-digit month (e.g., 01, 02, 12){DD}- 2-digit day (e.g., 01, 15, 31)
Time Placeholders:
{HH}- 2-digit hour in 24-hour format (e.g., 00, 13, 23){hh}- 2-digit hour in 12-hour format (e.g., 01, 12){mm}- 2-digit minute (e.g., 00, 30, 59){ss}- 2-digit second (e.g., 00, 30, 59){AMPM}- AM/PM indicator
Default Template:
If --run-name is not specified, the default template is:
Automated test run - {MMM} {DD}, {YYYY}, {hh}:{mm}:{ss} {AMPM}
Example Output:
Automated test run - Jan 15, 2025, 02:30:45 PM
The --run-name option is only used when creating new test runs (i.e., when --run-url is not specified).
Usage Examples:
# Create new run with default name template
qasphere junit-upload ./junit-results/results.xml

# Upload to existing run (--run-name is ignored)
qasphere junit-upload -r https://company.eu1.qasphere.com/project/BD/run/42 ./junit-results/results.xml

# Simple static name
qasphere junit-upload --run-name "v1.4.4-rc5" ./junit-results/results.xml

# With environment variables
qasphere junit-upload --run-name "Build #{env:BITBUCKET_BUILD_NUMBER} - {env:BITBUCKET_BRANCH}" ./junit-results/results.xml
# Output: "Build #12345 - main"

# With date placeholders
qasphere junit-upload --run-name "Release {YYYY}-{MM}-{DD}" ./junit-results/results.xml
# Output: "Release 2025-01-15"

# With date and time placeholders
qasphere junit-upload --run-name "Nightly Tests {MMM} {DD}, {YYYY} at {HH}:{mm}" ./junit-results/results.xml
# Output: "Nightly Tests Jan 15, 2025 at 22:34"

# Complex template with multiple placeholders
qasphere junit-upload --run-name "Build {env:BUILD_NUMBER} - {YYYY}/{MM}/{DD} {hh}:{mm} {AMPM}" ./junit-results/results.xml
# Output: "Build v1.4.4-rc5 - 2025/01/15 10:34 PM"

# With attachments
qasphere junit-upload --attachments ./junit-results/results.xml

# Multiple files
qasphere junit-upload ./junit-results/*.xml

# Force upload on errors
qasphere junit-upload --force ./junit-results/results.xml
Upload to Existing Test Run
To update a specific test run instead of creating a new one:
- step:
    name: Upload to QA Sphere
    script:
      - npm install -g qas-cli
      - |
        RUN_ID=42
        qasphere junit-upload \
          -r ${QAS_URL}/project/BD/run/${RUN_ID} \
          ./junit-results/results.xml
Upload with Attachments
Include screenshots and logs with your results:
- step:
    name: Upload to QA Sphere
    script:
      - npm install -g qas-cli
      - qasphere junit-upload --attachments ./junit-results/results.xml
The CLI automatically detects and uploads:
- Screenshots from test failures
- Video recordings
- Log files
- Any files referenced in the JUnit XML
Upload Multiple XML Files
If you have multiple test suites generating separate XML files:
- step:
    name: Upload to QA Sphere
    script:
      - npm install -g qas-cli
      - qasphere junit-upload ./junit-results/*.xml
Branch-Specific Runs
Create different runs for different branches:
- step:
    name: Upload to QA Sphere
    script:
      - npm install -g qas-cli
      - |
        if [ "$BITBUCKET_BRANCH" = "main" ]; then
          # Upload to production run
          qasphere junit-upload -r ${QAS_URL}/project/BD/run/100 ./junit-results/results.xml
        elif [ "$BITBUCKET_BRANCH" = "develop" ]; then
          # Upload to development run
          qasphere junit-upload -r ${QAS_URL}/project/BD/run/101 ./junit-results/results.xml
        else
          # Create new run for feature branches
          qasphere junit-upload ./junit-results/results.xml
        fi
Add Pipeline Metadata
Use the --run-name option to include Bitbucket pipeline information in test run titles:
- step:
    name: Upload to QA Sphere
    script:
      - npm install -g qas-cli
      - |
        qasphere junit-upload \
          --run-name "Build #{env:BITBUCKET_BUILD_NUMBER} - {env:BITBUCKET_BRANCH}" \
          ./junit-results/results.xml
      # Output: "Build #12345 - main"
Common Bitbucket Variables:
{env:BITBUCKET_BUILD_NUMBER}- Pipeline build number{env:BITBUCKET_BRANCH}- Branch name{env:BITBUCKET_COMMIT}- Full commit SHA{env:BITBUCKET_TAG}- Tag name (if applicable){env:BITBUCKET_REPO_SLUG}- Repository name{env:BITBUCKET_STEP_TRIGGERER_UUID}- User who triggered the pipeline
Examples:
# Pipeline with date and time
- script: qasphere junit-upload --run-name "Build #{env:BITBUCKET_BUILD_NUMBER} - {YYYY}-{MM}-{DD} {HH}:{mm}" ./junit-results/results.xml

# Branch and commit info
- script: qasphere junit-upload --run-name "{env:BITBUCKET_BRANCH} - {env:BITBUCKET_COMMIT}" ./junit-results/results.xml

# Complete metadata
- script: qasphere junit-upload --run-name "Build #{env:BITBUCKET_BUILD_NUMBER} ({env:BITBUCKET_BRANCH}) - {MMM} {DD}, {hh}:{mm} {AMPM}" ./junit-results/results.xml
Force Upload on Errors
Continue uploading even if some tests can't be matched:
- step:
    name: Upload to QA Sphere
    script:
      - npm install -g qas-cli
      - qasphere junit-upload --force ./junit-results/results.xml
Common Scenarios
Scenario 1: Nightly Test Runs
Run tests on a schedule and upload results with descriptive names:
image: node:18

definitions:
  steps:
    - step: &test-step
        name: Run Nightly Tests
        image: mcr.microsoft.com/playwright:v1.51.1-jammy
        script:
          - npm ci
          - npx playwright test
        artifacts:
          - junit-results/**

    - step: &upload-step
        name: Upload Results
        script:
          - npm install -g qas-cli
          # Create run with date in the name
          - qasphere junit-upload --run-name "Nightly Tests - {YYYY}-{MM}-{DD}" ./junit-results/results.xml
          # Output: "Nightly Tests - 2025-01-15"

pipelines:
  # Scheduled pipeline (configure in Bitbucket UI)
  custom:
    nightly:
      - step: *test-step
      - step: *upload-step
To create the schedule:
- Go to Repository settings → Pipelines → Schedules
- Click Create schedule
- Select the
nightlycustom pipeline - Set schedule (e.g., daily at 2 AM)
Scenario 2: Parallel Test Execution
Run tests in parallel and upload all results:
image: node:18

definitions:
  steps:
    - step: &test-unit
        name: Unit Tests
        script:
          - npm ci
          - npm run test:unit
        artifacts:
          - junit-results/unit-results.xml

    - step: &test-integration
        name: Integration Tests
        script:
          - npm ci
          - npm run test:integration
        artifacts:
          - junit-results/integration-results.xml

    - step: &upload-step
        name: Upload All Results
        script:
          - npm install -g qas-cli
          - qasphere junit-upload ./junit-results/*.xml

pipelines:
  default:
    - parallel:
        - step: *test-unit
        - step: *test-integration
    - step: *upload-step
Scenario 3: Multi-Environment Testing
Test against different environments:
image: node:18

definitions:
  steps:
    - step: &test-staging
        name: Test Staging
        script:
          - export TEST_ENV=staging
          - export BASE_URL=https://staging.example.com
          - npm ci
          - npm test
        artifacts:
          - junit-results/staging-results.xml

    - step: &test-production
        name: Test Production
        script:
          - export TEST_ENV=production
          - export BASE_URL=https://example.com
          - npm ci
          - npm test
        artifacts:
          - junit-results/production-results.xml

    - step: &upload-step
        name: Upload Results
        script:
          - npm install -g qas-cli
          - qasphere junit-upload ./junit-results/*.xml

pipelines:
  default:
    - parallel:
        - step: *test-staging
        - step: *test-production
    - step: *upload-step
Scenario 4: Version/Release Tagging
Tag test runs with version numbers or release names:
image: node:18

definitions:
  steps:
    - step: &test-step
        name: Run Release Tests
        image: mcr.microsoft.com/playwright:v1.51.1-jammy
        script:
          - npm ci
          - npx playwright test
        artifacts:
          - junit-results/**

    - step: &upload-step
        name: Upload Results
        script:
          - npm install -g qas-cli
          - |
            if [ -n "$BITBUCKET_TAG" ]; then
              # For git tags, use tag name
              qasphere junit-upload --run-name "Release {env:BITBUCKET_TAG}" ./junit-results/results.xml
            else
              # For regular commits, use branch and commit
              SHORT_SHA=$(echo "$BITBUCKET_COMMIT" | cut -c1-7)
              qasphere junit-upload --run-name "{env:BITBUCKET_BRANCH} - ${SHORT_SHA}" ./junit-results/results.xml
            fi

pipelines:
  tags:
    'v*':
      - step: *test-step
      - step: *upload-step

  branches:
    main:
      - step: *test-step
      - step: *upload-step
Troubleshooting
Issue: Tests Not Appearing in QA Sphere
Symptoms:
- Upload succeeds but no results in QA Sphere
- "Test case not found" warnings in logs
Solutions:
-
Ensure test cases exist in QA Sphere:
- Check that
BD-001,BD-002, etc. exist in your QA Sphere project - Verify the project code matches (BD, PRJ, etc.)
- Check that
-
Check marker format:
- Must be
PROJECT-NUMBERformat - Examples:
BD-001,PRJ-123,TEST-456
- Must be
Issue: Authentication Failed (401 Error)
Symptoms:
Error: Authentication failed (401)
Solutions:
-
Verify API key is correct:
- Go to QA Sphere → Settings → API Keys
- Check the key hasn't been deleted
- Regenerate if needed
-
Check Bitbucket variables:
- Repository settings → Repository variables
- Verify
QAS_TOKENis set correctly - Ensure no extra spaces or line breaks
- Verify the "Secured" checkbox is enabled
-
Verify key permissions:
- API key must have Test Runner role or higher
- Check user permissions in QA Sphere
Issue: JUnit XML File Not Found
Symptoms:
Error: File ./junit-results/results.xml does not exist
Solutions:
- Check test step artifacts:
- step:
    name: Run Tests
    script:
      - npm ci
      - npx playwright test
    artifacts:
      - junit-results/**  # Make sure this matches your output path
-
Verify test framework configuration:
- Playwright: Check
playwright.config.jsreporter - Cypress: Check
reporter-config.json - Jest: Check
jest.config.jsreporters
- Playwright: Check
-
Add debug output:
- step:
    name: Upload to QA Sphere
    script:
      - ls -la junit-results/  # List files
      - cat junit-results/results.xml  # Show content
      - npm install -g qas-cli
      - qasphere junit-upload ./junit-results/results.xml
Issue: Playwright Version Mismatch
Symptoms:
Error: Executable doesn't exist at /ms-playwright/chromium...
╔ - current: mcr.microsoft.com/playwright:v1.40.0-jammy
║ - required: mcr.microsoft.com/playwright:v1.51.1-jammy
Solution:
Match Docker image version to your Playwright package version:
# Check your Playwright version
npm list @playwright/test
# Output: @playwright/test@1.51.1
# Update bitbucket-pipelines.yml
- step:
    name: Run Playwright Tests
    image: mcr.microsoft.com/playwright:v1.51.1-jammy  # Match the version
Issue: Pipeline Fails But Tests Pass
Symptoms:
- Tests execute successfully
- Artifacts are uploaded
- Step still marked as failed
Solution:
Ensure test failures don't block artifact upload:
- step:
    name: Run Tests
    script:
      - npm ci
      - npx playwright test || true  # Continue even if tests fail
    artifacts:
      - junit-results/**
Or handle exit codes explicitly:
- step:
    name: Run Tests
    script:
      - npm ci
      - |
        set +e
        npx playwright test
        TEST_EXIT=$?
        set -e
        echo "Tests completed with exit code: $TEST_EXIT"
        exit 0  # Force success to allow artifact upload
    artifacts:
      - junit-results/**
Issue: Upload Step Doesn't Run
Symptoms:
- Test step completes
- Upload step never starts
Solutions:
- Check pipeline structure:
pipelines:
  default:
    - step:
        name: Run Tests
        script:
          - npm test
        artifacts:
          - junit-results/**
    - step:  # This should run after the previous step
        name: Upload Results
        script:
          - npm install -g qas-cli
          - qasphere junit-upload ./junit-results/results.xml
- Verify artifacts are defined:
- Artifacts from the test step must be declared
- They're automatically available in subsequent steps
Issue: Variables Not Available
Symptoms:
Error: QAS_TOKEN environment variable is not set
Solutions:
-
Verify variables are defined:
- Go to Repository settings → Repository variables
- Ensure
QAS_TOKENandQAS_URLexist
-
Check variable usage in pipeline:
- step:
    name: Upload to QA Sphere
    script:
      # Variables are automatically available as environment variables
      - npm install -g qas-cli
      - qasphere junit-upload ./junit-results/results.xml
- For deployment variables:
- If using deployment steps, ensure variables are available in that environment
- Check if variables need to be added to deployment environment settings
Issue: Pipeline Doesn't Trigger
Symptoms:
- Push code but pipeline doesn't run
- Pipeline file exists but not executing
Solutions:
- Verify pipeline file location:
bitbucket-pipelines.yml  ✅ Correct (in repository root)
.bitbucket-pipelines.yml  ❌ Wrong (no dot prefix)
pipelines/bitbucket-pipelines.yml  ❌ Wrong (should be in root)
- Check YAML syntax:
# Validate YAML locally
npx js-yaml bitbucket-pipelines.yml
-
Verify pipelines are enabled:
- Repository settings → Pipelines → Settings
- Ensure "Enable Pipelines" is checked
-
Check branch configuration:
pipelines:
  branches:
    main:  # Check branch names match exactly
      - step:
          name: Test
          script:
            - npm test
Best Practices
1. Always Use Markers
Include QA Sphere markers in all automated tests:
// ✅ Good
test('BD-001: User can login successfully', async ({ page }) => {});

// ❌ Bad - no marker
test('User can login successfully', async ({ page }) => {});
2. Upload on Every Pipeline Run
Configure upload to run even when tests fail by using || true or proper exit code handling:
- step:
    name: Run Tests
    script:
      - npm ci
      - npx playwright test || true
    artifacts:
      - junit-results/**

- step:
    name: Upload Results
    script:
      - npm install -g qas-cli
      - qasphere junit-upload ./junit-results/results.xml
This ensures you track both passing and failing test results.
3. Use Descriptive Run Names
Use the --run-name option to create meaningful test run titles:
- step:
    name: Upload to QA Sphere
    script:
      - npm install -g qas-cli
      - |
        qasphere junit-upload \
          --run-name "Build #{env:BITBUCKET_BUILD_NUMBER} - {env:BITBUCKET_BRANCH}" \
          ./junit-results/results.xml
For branch-specific runs, you can also upload to existing runs:
- step:
    name: Upload to QA Sphere
    script:
      - npm install -g qas-cli
      - |
        if [ "$BITBUCKET_BRANCH" = "main" ]; then
          # Upload to production run
          qasphere junit-upload -r ${QAS_URL}/project/BD/run/100 ./junit-results/results.xml
        elif [ "$BITBUCKET_BRANCH" = "develop" ]; then
          # Upload to development run
          qasphere junit-upload -r ${QAS_URL}/project/BD/run/101 ./junit-results/results.xml
        else
          # Create new run for feature branches
          SHORT_COMMIT=$(echo "$BITBUCKET_COMMIT" | cut -c1-7)
          qasphere junit-upload --run-name "{env:BITBUCKET_BRANCH} - ${SHORT_COMMIT}" ./junit-results/results.xml
        fi
4. Secure Your API Keys
- ✅ Store in Bitbucket Repository variables
- ✅ Enable "Secured" checkbox for sensitive values
- ✅ Rotate keys periodically
- ❌ Never commit to repository
- ❌ Never log or print in pipeline
5. Upload Attachments for Failures
Help debug failures by including screenshots:
- step:
    name: Upload to QA Sphere
    script:
      - npm install -g qas-cli
      - qasphere junit-upload --attachments ./junit-results/results.xml
6. Match Playwright Versions
Always keep Docker image version in sync with npm package:
// package.json
{
  "devDependencies": {
    "@playwright/test": "1.51.1"
  }
}
# bitbucket-pipelines.yml
- step:
    name: Run Tests
    image: mcr.microsoft.com/playwright:v1.51.1-jammy
7. Use Caching for Faster Builds
Cache dependencies to speed up pipeline runs:
definitions:
  caches:
    node: node_modules

- step:
    name: Run Tests
    caches:
      - node
    script:
      - npm ci
      - npx playwright test
8. Test Locally First
Before pushing to Bitbucket, test the integration locally:
# Set environment variables
export QAS_TOKEN=your.api.key
export QAS_URL=https://company.eu1.qasphere.com

# Run tests
npm test

# Upload results
npx qas-cli junit-upload ./junit-results/results.xml
9. Monitor Upload Success
Add error handling to track upload status:
- step:
    name: Upload to QA Sphere
    script:
      - npm install -g qas-cli
      - |
        if qasphere junit-upload ./junit-results/results.xml; then
          echo "✅ Successfully uploaded results to QA Sphere"
        else
          echo "❌ Failed to upload results to QA Sphere"
          exit 1
        fi
10. Use Step Definitions
Define reusable steps for cleaner pipelines:
definitions:
  steps:
    - step: &test
        name: Run Tests
        image: mcr.microsoft.com/playwright:v1.51.1-jammy
        caches:
          - node
        script:
          - npm ci
          - npx playwright test
        artifacts:
          - junit-results/**

    - step: &upload
        name: Upload to QA Sphere
        script:
          - npm install -g qas-cli
          - qasphere junit-upload --attachments ./junit-results/results.xml

pipelines:
  default:
    - step: *test
    - step: *upload
Complete Working Example
Here's a complete, production-ready configuration:
# bitbucket-pipelines.yml
image: node:18

definitions:
  caches:
    node: node_modules

  steps:
    - step: &test
        name: Run Playwright Tests
        image: mcr.microsoft.com/playwright:v1.51.1-jammy
        caches:
          - node
        script:
          - npm ci
          - npx playwright test || true  # Continue even if tests fail
        artifacts:
          - junit-results/**
          - test-results/**
          - playwright-report/**

    - step: &upload
        name: Upload Results to QA Sphere
        script:
          - npm install -g qas-cli

          # Verify results file exists
          - test -f junit-results/results.xml || (echo "Results file not found" && exit 1)

          # Upload with descriptive run name and attachments
          - |
            SHORT_COMMIT=$(echo "$BITBUCKET_COMMIT" | cut -c1-7)
            qasphere junit-upload \
              --run-name "Build #{env:BITBUCKET_BUILD_NUMBER} - {env:BITBUCKET_BRANCH} (${SHORT_COMMIT})" \
              --attachments \
              ./junit-results/results.xml

          - echo "✅ Test results uploaded to QA Sphere"
          - echo "View at: ${QAS_URL}/project/BD/runs"

pipelines:
  default:
    - step: *test
    - step: *upload

  branches:
    main:
      - step: *test
      - step: *upload

    develop:
      - step: *test
      - step: *upload

  pull-requests:
    '**':
      - step: *test
      - step: *upload

  custom:
    nightly:
      - step: *test
      - step:
          <<: *upload
          name: Upload Nightly Results
          script:
            - npm install -g qas-cli
            - test -f junit-results/results.xml || (echo "Results file not found" && exit 1)
            - qasphere junit-upload --run-name "Nightly Tests - {YYYY}-{MM}-{DD}" --attachments ./junit-results/results.xml
Next Steps
Once you have the basic integration working:
- Add More Tests - Expand your test coverage with proper markers
- Set Up Schedules - Run tests nightly using Bitbucket's scheduled pipelines
- Create Dashboards - Use QA Sphere reports to track quality trends
- Configure Notifications - Get alerts for test failures
- Integrate with Jira - Link test failures to bug tickets (Bitbucket and Jira integrate natively)
Additional Resources
- QA Sphere CLI Documentation - Playwright Integration
- QA Sphere CLI Documentation - WebdriverIO Integration
- QA Sphere API Documentation
- Authentication Guide
- Bitbucket Pipelines Documentation
- Playwright Documentation
Getting Help
If you encounter issues:
- Check the Troubleshooting section above
- Review pipeline logs in Bitbucket
- Test CLI locally with same configuration
- Contact QA Sphere support: support@qasphere.com
Summary: You now have everything you need to integrate QA Sphere with Bitbucket Pipelines. The QAS CLI tool automatically handles test result uploads, making test management seamless and automated. Every pipeline run will now update QA Sphere with the latest test results.